How to Deploy Cloud: Part 1
How to deploy .NET application in Windows Azure Platform
1. Starting IIS
1. Click Start à Control Panel. Click Programs.
2. Turn Windows Features on or off under Programs and Features.
3. Enable all the checkboxes corresponding to Internet Information Services. Click OK.
4. Please wait while the window is making changes to the features and then close the window.
2.Downloads
The following files should be downloaded from http://go.microsoft.com/fwlink/?LinkID=254364 or http://www.microsoft.com/en-us/download/details.aspx?id=29988 :
1. WindowsAzureTools.VS100.exe
2. WindowsAzureEmulator-x64.exe
3. Environment Setup
1. Open Internet Browser and type http://go.microsoft.com/fwlink/?LinkID=254364 in the address bar.
2. Click Save à Save as.
3. Browse to the location where you want to save the file. Click Save.
4. Once the download is complete, click open folder and run.
5. Click install and once the installation is done, restart the system.
6. After the system reboots, installation starts automatically.
7. Click Finish.
8. Click Exit.
4. Start Emulators
1. Click Start->All Programs->Windows Azure->Emulator->Compute Emulator and click Allow access.
2. Click Start->All Programs->Windows Azure->Emulator->Storage Emulator.
3. Command prompt opens and closes automatically.
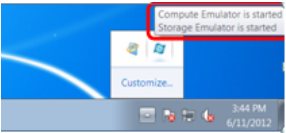
4. Click on the icon and make sure that both the emulators have been started
1. Starting IIS
1. Click Start à Control Panel. Click Programs.
2. Turn Windows Features on or off under Programs and Features.
3. Enable all the checkboxes corresponding to Internet Information Services. Click OK.
4. Please wait while the window is making changes to the features and then close the window.
2.Downloads
The following files should be downloaded from http://go.microsoft.com/fwlink/?LinkID=254364 or http://www.microsoft.com/en-us/download/details.aspx?id=29988 :
1. WindowsAzureTools.VS100.exe
2. WindowsAzureEmulator-x64.exe
3. Environment Setup
1. Open Internet Browser and type http://go.microsoft.com/fwlink/?LinkID=254364 in the address bar.
2. Click Save à Save as.
3. Browse to the location where you want to save the file. Click Save.
4. Once the download is complete, click open folder and run.
5. Click install and once the installation is done, restart the system.
6. After the system reboots, installation starts automatically.
7. Click Finish.
8. Click Exit.
4. Start Emulators
1. Click Start->All Programs->Windows Azure->Emulator->Compute Emulator and click Allow access.
2. Click Start->All Programs->Windows Azure->Emulator->Storage Emulator.
3. Command prompt opens and closes automatically.
4. Click on the icon and make sure that both the emulators have been started
5. Create Project
1. Click Start->All Programs->Microsoft Studio 2012 Express->right click on VS Express for Web->Run as administrator.
2. Click new project->visual c#->cloud.
3. Select .Net framework4 from the dropdown menu.
4. Enter name and location for your project to be saved.
5. Select ASP.NET Web Role. Click on the right arrow.
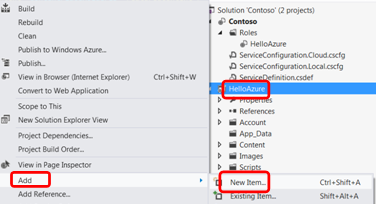
6. The Project will open. Right click on the web role. Click Add->New Item.
1. Click Start->All Programs->Microsoft Studio 2012 Express->right click on VS Express for Web->Run as administrator.
2. Click new project->visual c#->cloud.
3. Select .Net framework4 from the dropdown menu.
4. Enter name and location for your project to be saved.
5. Select ASP.NET Web Role. Click on the right arrow.
6. The Project will open. Right click on the web role. Click Add->New Item.