
How to Deploy Cloud: Part 2
1. Select the item you want to add and click Add.
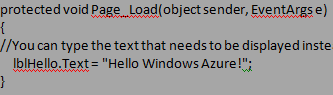
2. Create a form and insert a label. Right click on the window and click View Code.
3. Write a sample code to display some text.
2. Create a form and insert a label. Right click on the window and click View Code.
3. Write a sample code to display some text.
Click Solution Explorer. Right click on the page name. Click Set As Start Page.
NOTE: For example, HelloWindowsAzure.aspx.
1. Click start or press F5. A dialog box appears, tick the check box. Hello Windows Azure opens.
NOTE: The URL is http://127.0.0.1:81/HelloWindowsAzure.aspx in our case.
6. Open Azure Account with Passcode
1. Enter the URL http://www.WindowsAzurePass.com/azureu in a web browser.
2. Enter the details. Click Submit.
3. Enter Windows Live ID and Password. Click Sign in. Once you have provided the appropriate details, the message you have successfully requested your Windows Azure Pass appears.
7. Upload Project On Azure Account
1. Click Start->All Programs->Microsoft Visual Studio 2012 Express->Right click on VS Express for Web->Run as administrator.
2. Open the project. In the toolbar select release from the drop down men
3. Click Solution Explorer. Right Click on the project name. Click Clean Solution and wait till a message Clean Succeeded appears
4. Click Solution Explorer. Right Click on the project name. Click Rebuild Solution. The message Rebuildall succeeded appears.
5. Click Solution Explorer. Right Click on the solution. Click Package…A dialog box appears select package. Package is ready. Browser window opens automatically with two files generated.
a. Contoso (Service Package file (.cspkg))
b. ServiceConfiguration.Cloud (Cloud Service Configuration file (.cscfg)) Copy the path.
NOTE: For Example, path is C:\Contoso\Contoso\Contoso\bin\Release\app.publish in our case.
6. Enter the URL https://manage.windowsazure.com/ in the address bar of Internet Explorer and sign in.
7. A screen appears, click cloud services and click create a cloud service. Enter URL. Select REGION / AFFINITY GROUP from the drop down.
8. Click CREATE CLOUD SERVICE.
9. Cloud Service has been created. Click on the Name. Click STAGING.
NOTE: Since we are uploading an application for testing purpose, we are uploading on staging server. You can also choose PRODUCTION.
10. Click UPLOAD NEW STAGING DEPLOYMENT.
11. Enter DEPLOYMENT NAME. Click Browse icon under Package.
12. Paste path of the package location.
NOTE: For Example, the path in our case is C:\Contoso\Contoso\Contoso\bin\Release\app.publish
13. Select File name. Click Open.
NOTE: For example, File name is Contoso in our case.
14. Click Browse icon under CONFIGURATION. Select ServiceConfiguration.Cloud and Click Open.
15. Enable the checkbox Deploy even if one or more roles contain a single instance. Click right icon.
16. Staging deployment will start and the application is loaded.
17. Once the application is created, it will start Initializing and a message will appear that the application has been successfully deployed.
18. The application is deployed, following screen appears. Click SITE URL
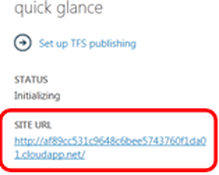
19. Default page of the site will open and change the URL to show the page created in our project and press Enter. For example, http://af89cc531c9648c6bee5743760f1da01.cloudapp.net/HelloWindowsAzure.aspx
20. A screen appears displaying HELLO WINDOWS AZURE.
20. A screen appears displaying HELLO WINDOWS AZURE.